Job Templates
Templates are snippets of predefined code that people can use to replace a job definition in a screwdriver.yaml. A template contains a series of predefined steps along with a selected Docker image.
Finding templates
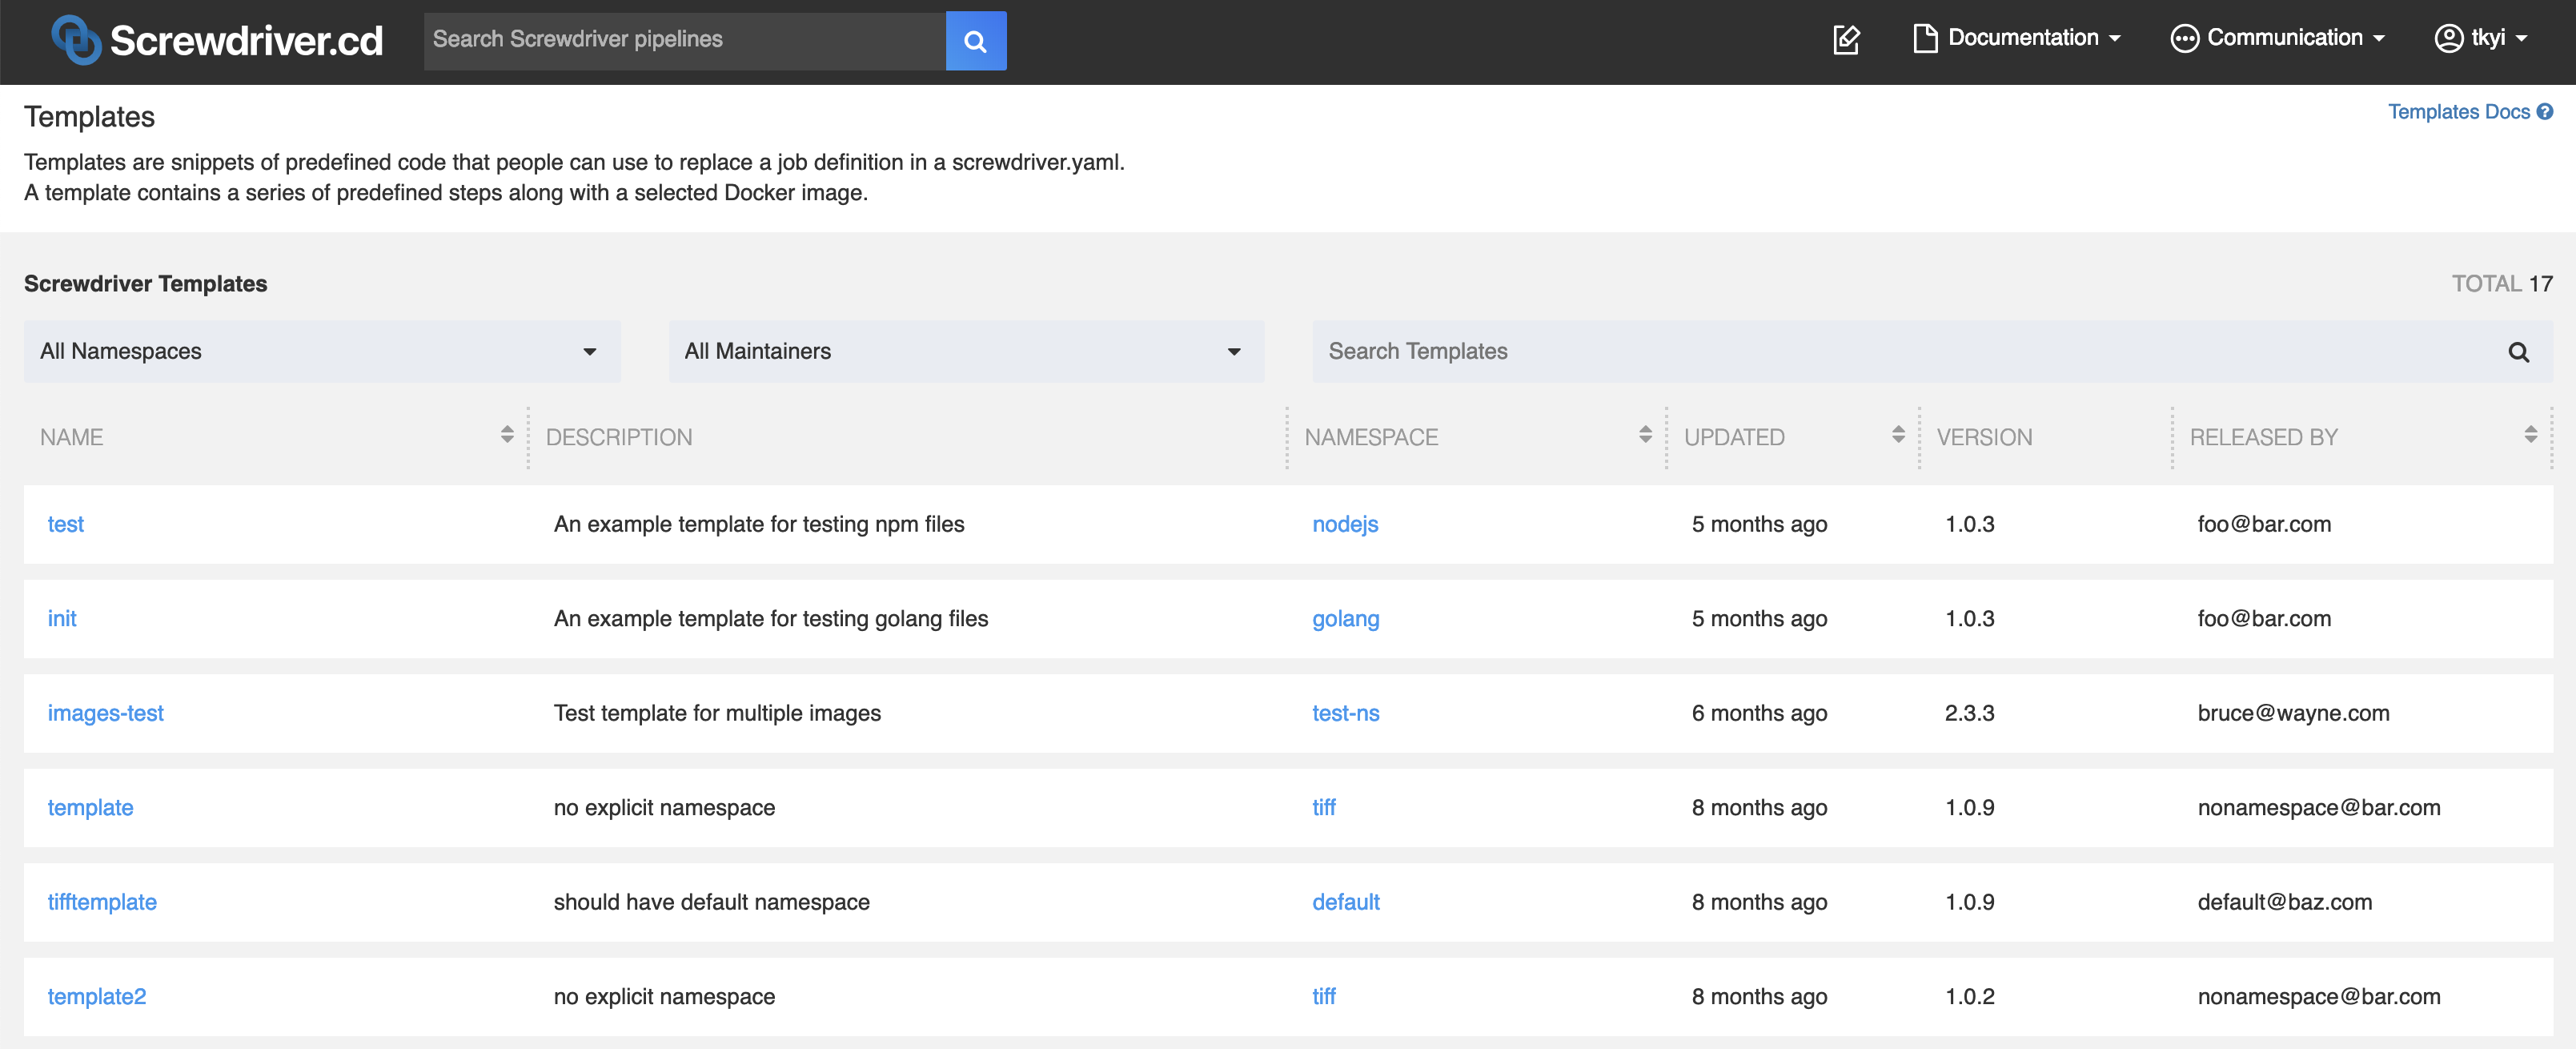
To figure out which templates already exist, you can make a GET call to the /templates API endpoint. You can also see templates in the UI at <YOUR_UI_URL>/templates.
Example templates page:
Using a template
To use a template, define a screwdriver.yaml with a template key. In this example, we are using the nodejs/test template.
Example screwdriver.yaml:
jobs:
    main:
        requires: [~pr, ~commit]
        template: nodejs/test@1.0.4
Version is semver compatible. For example you can refer above template with nodejs/test@1 or nodejs/test@1.0
You can also refer to a template version with a tag name if the template has one. All the versions and tags of a template are displayed at the bottom of a template’s description, such as for the example template, which has the tags latest and stable.
Most templates will tag the most recent version as latest, and many templates use either automated testing or manual curation to identify some version as stable. These are floating tags, so using them in a job means its template-provided steps may suddenly change.
If no template version is specified, the most recently published will be used. This is usually synonymous with specifying the latest tag. It is generally better to explicitly state a template version than to implictly use latest.
The most reliable way to avoid unexpected template changes is to refer to a specific version of the template. For instance, nodejs/test@1.0.4 is an immutable reference to a particular list of steps. Using a reference such as nodejs/test@1.0 means that a job will automatically use nodejs/test@1.0.5 when it becomes available, but that comes with risk of an unexpected change in behavior.
Version/Tag Semantics
Template versions can be referenced in a variety of ways that express users’ trade-off between an unchanging set of steps and automatically using improvements that a template’s maintainers have added. As above, these examples reference nodejs/test template.
nodejs/test@latest- this will use the most recently published version of the template, which may include backwards-incompatible changes, major version changes, etc. Thelatesttag should primarily be used by a template’s maintainers and may be unsuitable for production or similarly important builds.nodejs/test@stable- this will use a version of the template that its maintainers have designated as sufficiently stable for general usage. It may represent a significant change in capability from older uses of thestabletag. Template maintainers should communicate to users when changes to thestabletag are not backwards compatible.nodejs/test@1- this will use the most recent version ofnodejs/testthat is less than 2.0.0. This is essentially thelatesttag without crossing a major version boundary.nodejs/test@1.0- this will use the most recent version ofnodejs/testthan is less than 1.1.0. This is essentially thelatesttag without crossing a minor version boundary.nodejs/test@1.0.4- this is the most predictable way to specify a pipeline’s behavior and is not affected by future changes to the template.
Example
For this configuration:
jobs:
    main:
        requires: [~pr, ~commit]
        template: nodejs/test@stable
Screwdriver takes the template configuration and plugs it in, so that the screwdriver.yaml becomes:
jobs:
    main:
        image: node:lts
        requires: [~pr, ~commit]
        steps:
          - install: npm install
          - test: npm test
        environment:
            FOO: bar
        secrets:
              - NPM_TOKEN
Overriding Template Steps
A job can override Template steps by wrapping or replacing existing steps.
Wrap
Wrapping is when you add commands to run before and/or after an existing step. To wrap a step from a template, add a pre or post in front of the step name.
Example:
jobs:
    main:
        requires: [~pr, ~commit]
        template: nodejs/test@1.0.3
        steps:
            - preinstall: echo pre-install
            - postinstall: echo post-install
This will run the command echo pre-install before the template’s install step, and echo post-install after the template’s install step.
Replace
To replace a step from a template, add your command with the same template’s step name.
Example:
jobs:
    main:
        requires: [~pr, ~commit]
        template: nodejs/test@1.0.3
        steps:
            - install: echo skip installing
This will run the command echo skip installing for the install step.
Note: You cannot replace a locked step.
You can also replace the image defined in the template. Some template steps might rely on commands or environment invariants that your image may not have, so be careful when replacing.
Example:
jobs:
    main:
        requires: [~pr, ~commit]
        image: node:latest
        template: nodejs/test@1.0.3
Merging with shared steps
When overriding Template steps, a job can get the step definitions from either shared.steps or job.steps with precedence for steps defined in job section. This follows the same order of precedence for step definitions without using a template. Users can change this behavior using annotation screwdriver.cd/mergeSharedSteps: true. When true steps in shared and job sections are merged when a Template is used.
Example
shared:
  annotations:
    screwdriver.cd/mergeSharedSteps: true
  steps:
     - premotd: echo build
jobs:
    main:
        template: python/package_rpm@latest
        requires: [~pr, ~commit]
        steps:
         - preinit_os: echo replace
Example
The following example defines a merged shared configuration for image and steps, which is used by the main and main2 jobs.
shared:
    image: node:lts
    steps:
        - init: npm install
        - pretest: npm lint
        - test: npm test

jobs:
    main:
        requires: [~pr, ~commit]
        image: node:lts
    main2:
        annotations:
            screwdriver.cd/mergeSharedSteps: true
        requires: [main]
        steps:
            - test: echo Skipping test
The above example would be equivalent to:
jobs:
    main:
        requires: [~pr, ~commit]
        image: node:lts
        steps:
             - init: npm install
             - pretest: npm lint
             - test: npm test
    main2:
        annotations:
             screwdriver.cd/mergeSharedSteps: true
        requires: [main]
        image: node:lts
        steps:
             - pretest: npm lint
             - test: echo Skipping test
Order
When using a template in your configuration, you can pick and choose steps defined by the template and your own configuration with the order field. This field is defined as an ordered array of step names.
Caveats when using order:
ordercan only be used whentemplateis used.- Steps that cannot be found will be skipped.
- User-defined
teardown-steps will always be run after the rest of the steps are done. - Implicit wrapping of steps(pre/post) will not work with this field.
- The priority in determining duplicate step definitions goes like this: job > template
- When the annotation
screwdriver.cd/mergeSharedSteps: true, priority will be: job > shared > template
Example sd-template.yaml:
namespace: nodejs
name: publish
version: "2.0.1"
description: 'Publish an npm package'
maintainer: myname@foo.com
images:
  lts: node:lts
  latest: node:latest
config:
  image: stable
  steps:
    - install: npm install
    - publish: npm publish
    - coverage: coverage test.js
Example screwdriver.yaml:
jobs:
  main:
    requires: [~commit]
    image: stable
    template: nodejs/publish@2
    order: [clone, install, doesnotexist, test, publish, coverage]
    steps:
      - test: npm test
      - clone: git clone https://github.com/screwdriver-cd/toolbox.git ci
      - coverage: ./ci/coverage.sh
Result:
jobs:
  main:
    requires: [~commit]
    image: node:lts
    steps:
      - clone: git clone https://github.com/screwdriver-cd/toolbox.git ci
      - install: npm install
      - test: npm test
      - publish: npm publish
      - coverage: ./ci/coverage.sh  # This step was overwritten by the job
Creating a template
Publishing and running templates must be done from a Screwdriver pipeline.
Writing a template yaml
To create a template, create a new repo with a sd-template.yaml file. The file should contain a namespace, name, version, description, maintainer email, and a config with an image and steps. If no namespace is specified, a ‘default’ namespace will be applied. An optional images keyword can be defined to list supported images with a descriptive label. Basic example can be found in our screwdriver-cd-test/template-example repo.
Example sd-template.yaml:
namespace: myNamespace
name: template_name
version: '1.3'
description: template for testing
maintainer: foo@bar.com
images:
    lts-image: node:lts
    latest-image: node:latest
config:
    image: stable-image
    steps:
        - install: npm install
        - test: npm test
    environment:
        FOO: bar
    secrets:
        - NPM_TOKEN
Template images
We recommend using the images feature, which can be configured to list supported images with a descriptive label or alias.
For example:
namespace: myNamespace
name: template_name
version: '1.3'
description: template for testing
maintainer: foo@bar.com
images:
    lts-image: node:lts
    latest-image: node:latest
Users can pick an alias from the list and use it like so:
jobs:
    main:
        template: myNamespace/template_name@1.3.0
        image: stable-image
Example repo: https://github.com/screwdriver-cd-test/template-images-example
Template Steps
Avoid using any wrapping prefixes (pre or post) in your step names, as it can lead to problems when users try to modify or enhance your steps. For example, if a template has these steps:
config:
    image: node:lts
    steps:
        - preinstall: echo Installing
        - install: npm install
        - test: npm test
And a user consumes that template with some additional steps:
jobs:
    main:
        template: myNamespace/template_name@1.3.0
        steps:
          - preinstall: echo foo
It becomes unclear whether the user was trying to override preinstall or wrap install.
Template Locked Steps
You can specify steps that cannot be overwritten and must be included when using order by adding a locked key to your steps. It expects a boolean value (true/false; default is false).
This flag applies to any template or job that uses this template. All templates using a template with a locked step will also have the same locked step.
config:
    image: node:lts
    steps:
        - preinstall: echo Installing
        - install: npm install
        - test:
            command: npm test
            locked: true
Template parameters
You can define parameters that can be used in the steps.
Example sd-template.yaml:
namespace: myNamespace
name: favorites
version: '2.0.1'
description: template for testing parameters
maintainer: foo@bar.com
config:
  image: node:lts
  parameters:
    music:
      value: [ "country", "hip hop" ]
      description: "favorite music"
    color: [ "black", "white" ]
    sports:
      value: [ "baseball", "basketball" ]
  steps:
    - step_print_template_parameters: |
        echo music = $(meta get parameters.music)
        echo color = $(meta get parameters.color)
        echo sports = $(meta get parameters.sports)
Example repo: https://github.com/screwdriver-cd-test/template-parameters-example
These parameters are inherited by all the jobs using the template.
Example screwdriver.yaml:
jobs:
  # Inherits parameters "music", "color" and "sports" from the template.
  main1:
    requires: [~pr, ~commit]
    template: favorites/myNamespace@2
  # Inherits parameters "music", "color" and "sports" from the template.
  main2:
    requires: [main1]
    template: favorites/myNamespace@2
is equivalent to
jobs:
  main1:
    requires: [~pr, ~commit]
    parameters:
      music:
        value: [ "country", "hip hop" ]
        description: "favorite music"
      color: [ "black", "white" ]
      sports:
        value: [ "baseball", "basketball" ]
    steps:
      - step_print_template_parameters: |
          echo music = $(meta get parameters.music)
          echo color = $(meta get parameters.color)
          echo sports = $(meta get parameters.sports)
  main2:
    requires: [main1]
    parameters:
      music:
        value: [ "country", "hip hop" ]
        description: "favorite music"
      color: [ "black", "white" ]
      sports:
        value: [ "baseball", "basketball" ]
    steps:
      - step_print_template_parameters: |
          echo music = $(meta get parameters.music)
          echo color = $(meta get parameters.color)
          echo sports = $(meta get parameters.sports)
Users can override the parameter definition at pipeline scope or/and at job scope with job scope taking precedence over pipeline scope.
Example screwdriver.yaml
# Overrides the parameter "music" from the template (favorites/myNamespace) used by the jobs at pipeline scope which get applied to all the jobs, unless the job overrides it.
parameters:
  music: [jazz, rock]

jobs:
  # Inherits parameters "color" and "sports" from the template.
  # Since the parameter "music" from the template is overridden at the pipeline scope, it is not is not inherited at job scope.
  default_template_params:
    requires: [~pr, ~commit]
    template: favorites/myNamespace@2

  # Inherits parameter "sports" from the template.
  # Since the parameter "music" from the template is overridden at the pipeline scope, it is not is not inherited at job scope.
  # Overrides the parameter "color" from the template.
  override_template_params:
    requires: default_template_params
    template: favorites/myNamespace@2
    parameters:
      color: [ red, blue ]
Example repo: https://github.com/screwdriver-cd-test/job-with-template-parameters-build-example
Caveats
- Cannot do the following in a pull request: publish a template, create a tag, delete a tag or template
- A template can only be published by one pipeline
Template Composition
You can also use a template in the config section of an sd-template.yaml file.
Caveats:
ordercan only be used whentemplateis used.- Steps that cannot be found will be skipped.
- User-defined
teardown-steps will always be run after the rest of the steps are done. - Implicit wrapping of steps(pre/post) will not work with this field.
- The priority in determining duplicate step definitions goes like this: current template > preexisting template
- If you use a
templatein ansd-template.yaml, theimagesfield will also be merged.
Example preexisting sd-template.yaml:
namespace: nodejs
name: publish
version: "2.0.1"
description: 'Publish an npm package'
maintainer: myname@foo.com
images:
  lts: node:lts
  latest: node:latest
config:
  image: stable
  steps:
    - install: npm install
    - publish: npm publish
    - coverage: coverage test.js
Example sd-template.yaml:
namespace: d2lam
name: personal
version: "1.0.2"
description: 'Do some stuff'
maintainer: d2lam@foo.com
images:
  test: node:lts
config:
  template: nodejs/publish@2
  image: stable
  order: [clone, install, doesnotexist, test, publish, coverage]
  steps:
    - test: npm test
    - clone: git clone https://github.com/screwdriver-cd/toolbox.git ci
    - coverage: ./ci/coverage.sh
Result:
namespace: d2lam
name: personal
version: "1.0.2"
description: 'Do some stuff'
maintainer: d2lam@foo.com
images:
  lts: node:lts
  latest: node:latest
  test: node:lts
config:
  image: stable
  steps:
    - clone: git clone https://github.com/screwdriver-cd/toolbox.git ci
    - install: npm install
    - test: npm test
    - publish: npm publish
    - coverage: ./ci/coverage.sh  # This step was overwritten by the d2lam/personal template
Writing a screwdriver yaml for your template repo
Validating templates
To validate your template, run the template-validate script from the screwdriver-template-main npm module in your main job to validate your template. This means the build image must have NodeJS and NPM properly installed to use it. To publish your template, run the template-publish script from the same module in a separate job.
By default, the file at ./sd-template.yaml will be read. However, a user can specify a custom path using the env variable: SD_TEMPLATE_PATH.
You can also validate your sd-template.yaml and screwdriver.yaml through the UI by copy pasting it at <YOUR_UI_URL>/validator.
Tagging templates
You can optionally tag a specific template version by running the template-tag script from the screwdriver-template-main npm package. This must be done by the same pipeline that your template is created by. You will need to provide arguments to the script: template name and tag. You can optionally specify a version; the version needs to be an exact version (see tag step). If the version is omitted, the most recent version will be tagged (see autotag step).
To remove a template tag, run the template-remove-tag script. You will need to provide the template name and tag as arguments.
Example screwdriver.yaml:
shared:
    image: node:lts
jobs:
    main:
        requires: [~pr, ~commit]
        steps:
            - install: npm install screwdriver-template-main
            - validate: ./node_modules/.bin/template-validate
        environment:
            SD_TEMPLATE_PATH: ./path/to/template.yaml
    publish:
        requires: [main]
        steps:
            - install: npm install screwdriver-template-main
            - publish: ./node_modules/.bin/template-publish
            - autotag: ./node_modules/.bin/template-tag --name myNamespace/template_name --tag latest
            - tag: ./node_modules/.bin/template-tag --name myNamespace/template_name --version 1.3.0 --tag stable
        environment:
            SD_TEMPLATE_PATH: ./path/to/template.yaml
    remove:
        steps:
            - install: npm install screwdriver-template-main
            - remove: ./node_modules/.bin/template-remove --name myNamespace/template_name
    remove_tag:
        steps:
            - install: npm install screwdriver-template-main
            - remove_tag: ./node_modules/.bin/template-remove-tag --name myNamespace/template_name --tag stable
Create a Screwdriver pipeline with your template repo and start the build to validate and publish it.
To update a Screwdriver template, make changes in your SCM repository and rerun the pipeline build.
Testing a template
In order to test your template, set up a remote test for your template by creating another pipeline which uses your template, as seen in the template-test-example. This example pipeline runs after the publish_nodejs_template is done by using the remote triggers feature.
Note: You cannot test your template in the same pipeline, as template step expansion is done at event creation time. Therefore, the pipeline would use an older version of your template if you try to use it in the pipeline where you create it.
Using the build cache
To use the build cache feature, the store-cli command can be invoked in a step. For instance, if you are caching your node_modules/ folder, you can specify a step before the npm install command that downloads the cache and another step afterwards that uploads the cache. You can also move the uploading cache step to a teardown with the teardown- prefix.
config:
    image: node:lts
    steps:
        - getcache: store-cli get node_modules/ --type=cache --scope=event || echo "Failed to fetch Cache"
        - install: npm install
        - teardown-putcache: store-cli set node_modules/ --type=cache --scope=event || echo "Failed to publish Cache"
Removing a template
Using screwdriver-template-main npm package
To remove your template, you can run the template-remove script. You will need to provide the template name as an argument.
Using the UI
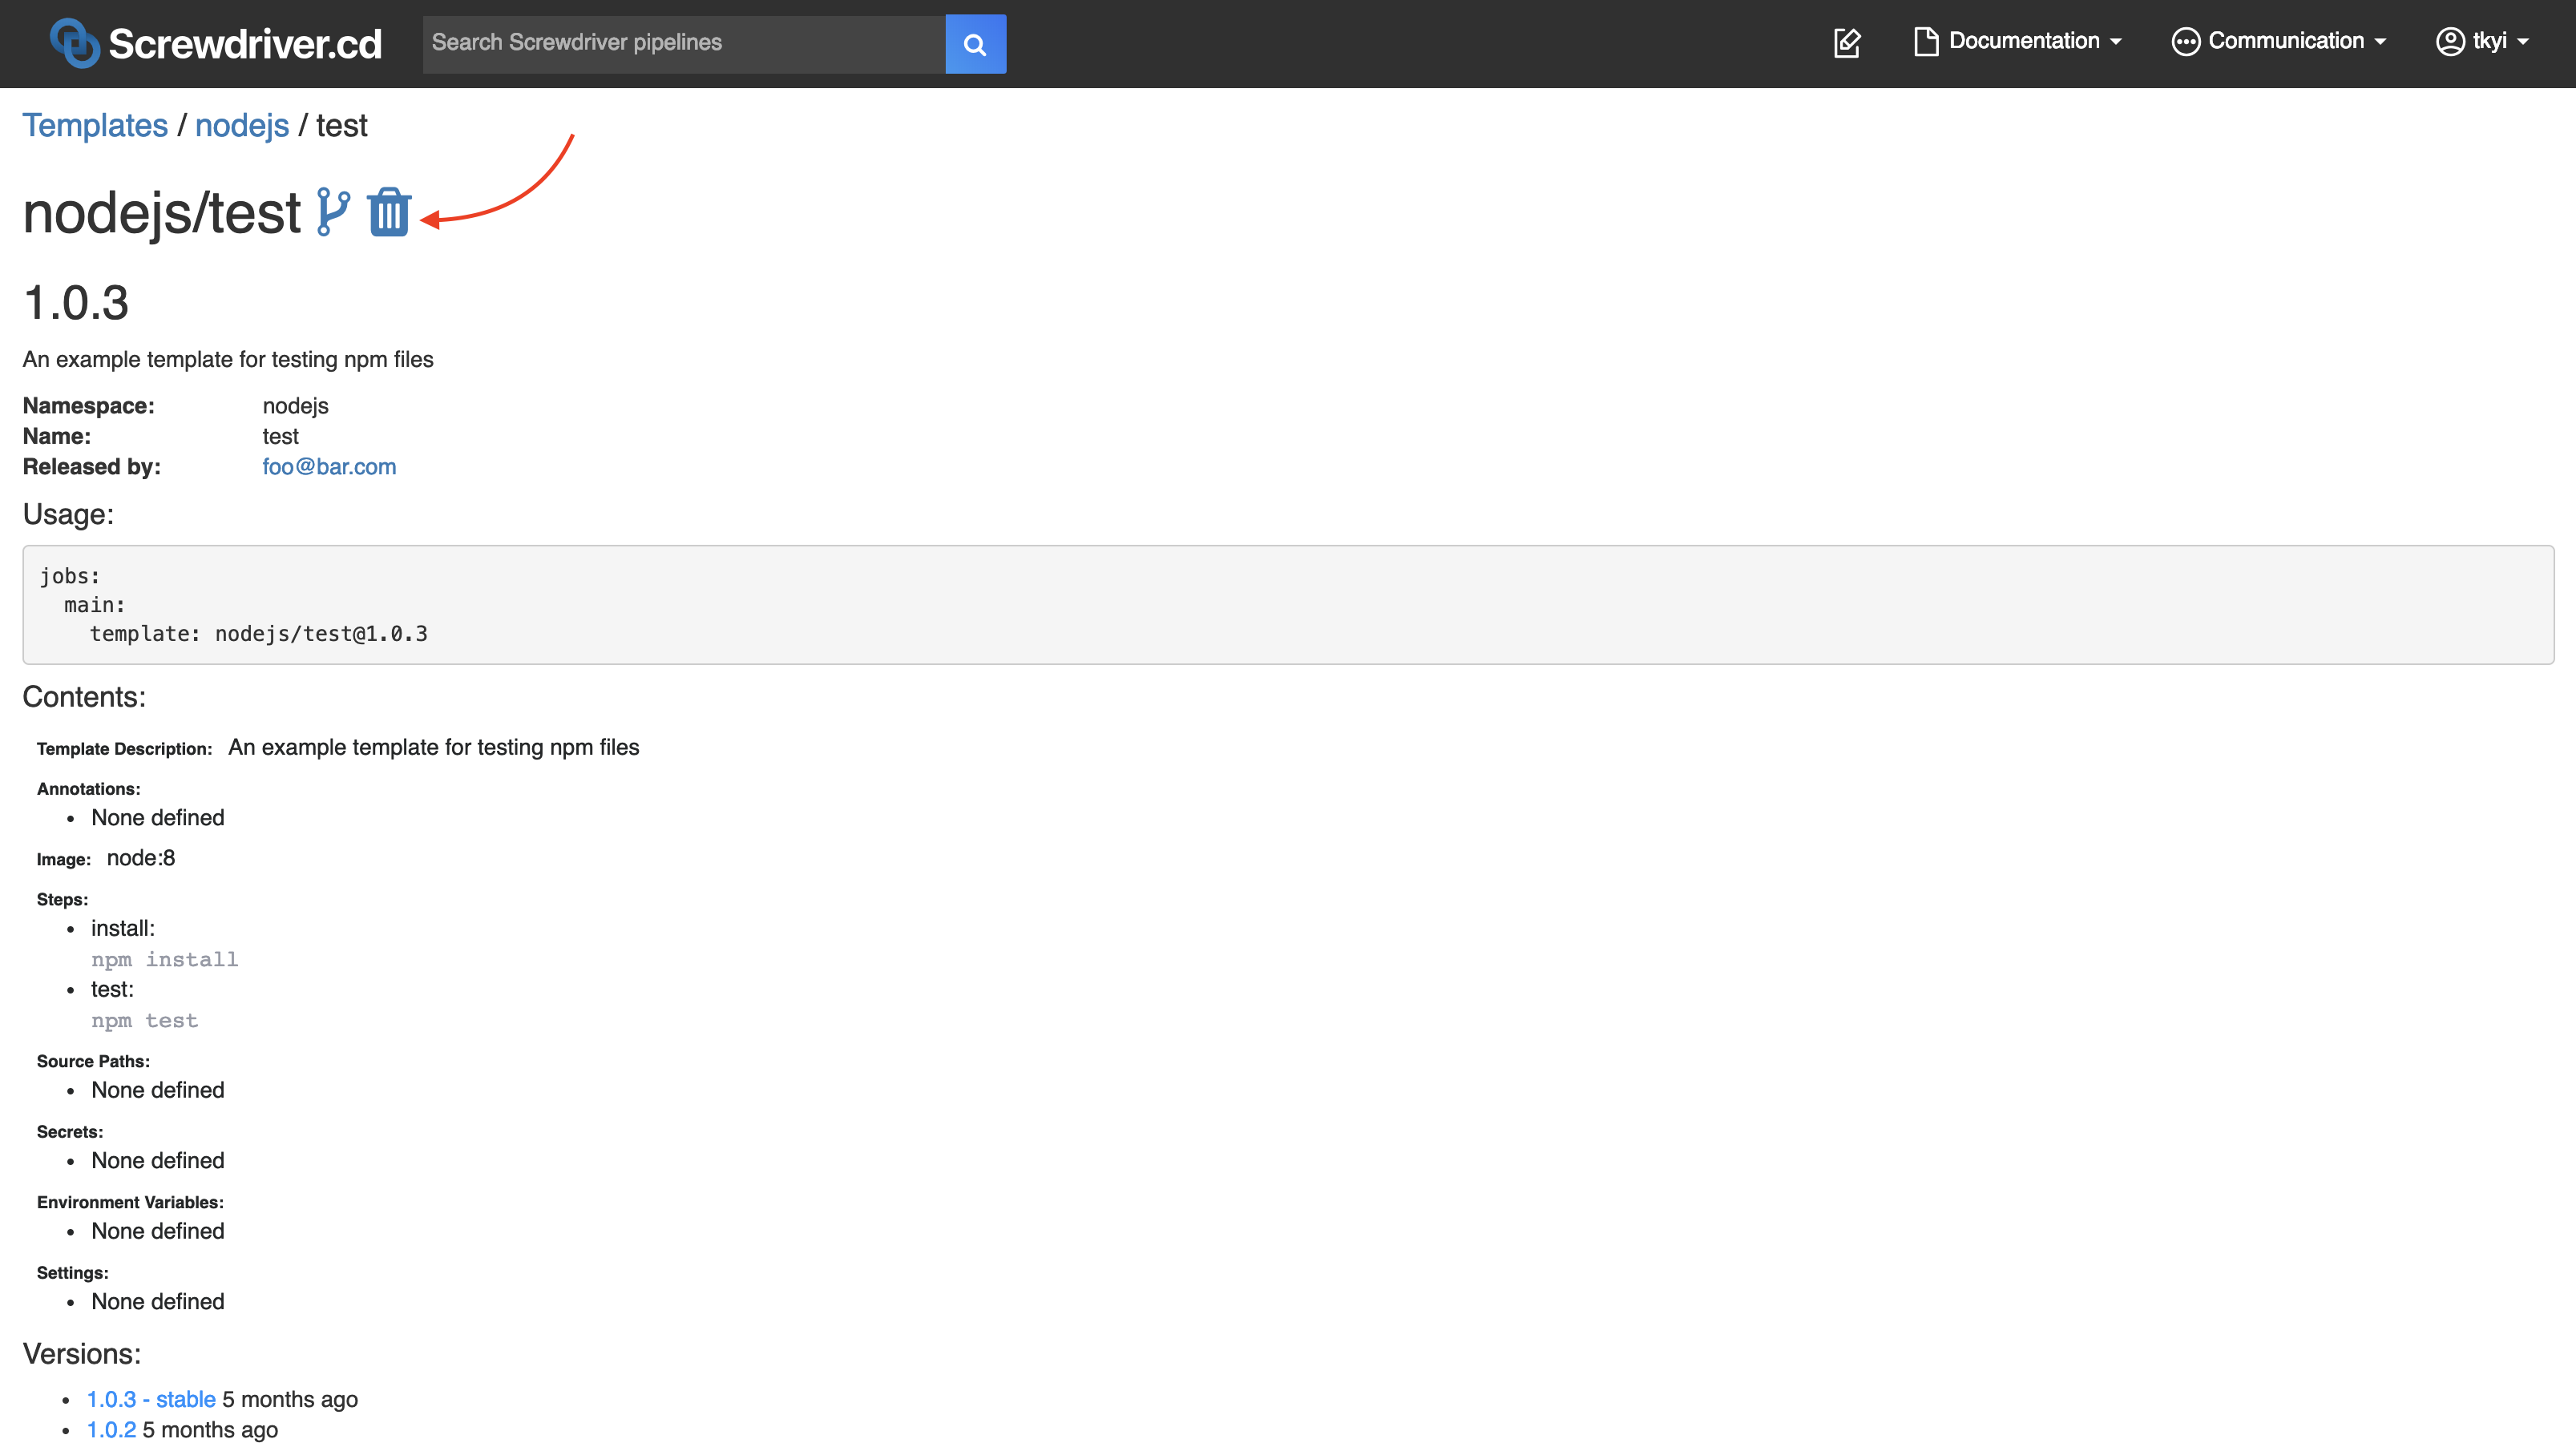
Or, you can remove your template and all its associated tags and versions by clicking on the trash icon in the UI on the template page.
Note: Do not delete your template pipeline beforehand, because it is required to determine who has permission to delete the template.