開発を開始する
Screwdriver をローカルで実行してテストするために、ローカルの開発環境を構築するための方法が2つあります。
- Screwdriver の API と UI をローカルで起動させる - npmパッケージの依存関係をテストしたり、ローカルでビルドを実行するのに最適です。 ローカル環境に構築をご覧ください。
- SD-in-a-box を起動させる - 手動設定なしでビルドを実行するのに最適です。SD-in-a-boxのドキュメントをご覧ください。
ローカル環境に構築
事前準備
- Node v12.0.0以上
- Docker
Docker Desktopを利用している際に、
HTTP code 407issueの問題が発生する場合は別のクライアントの利用を検討してください。
ステップ1: hostsファイルでドメイン名sd.screwdriver.cdとあなたのipを関連付けます
- この行を/etc/hostsファイルに追加します。
127.0.0.1 sd.screwdriver.cd
ステップ2: GitHub OAuth アプリケーションの新規作成
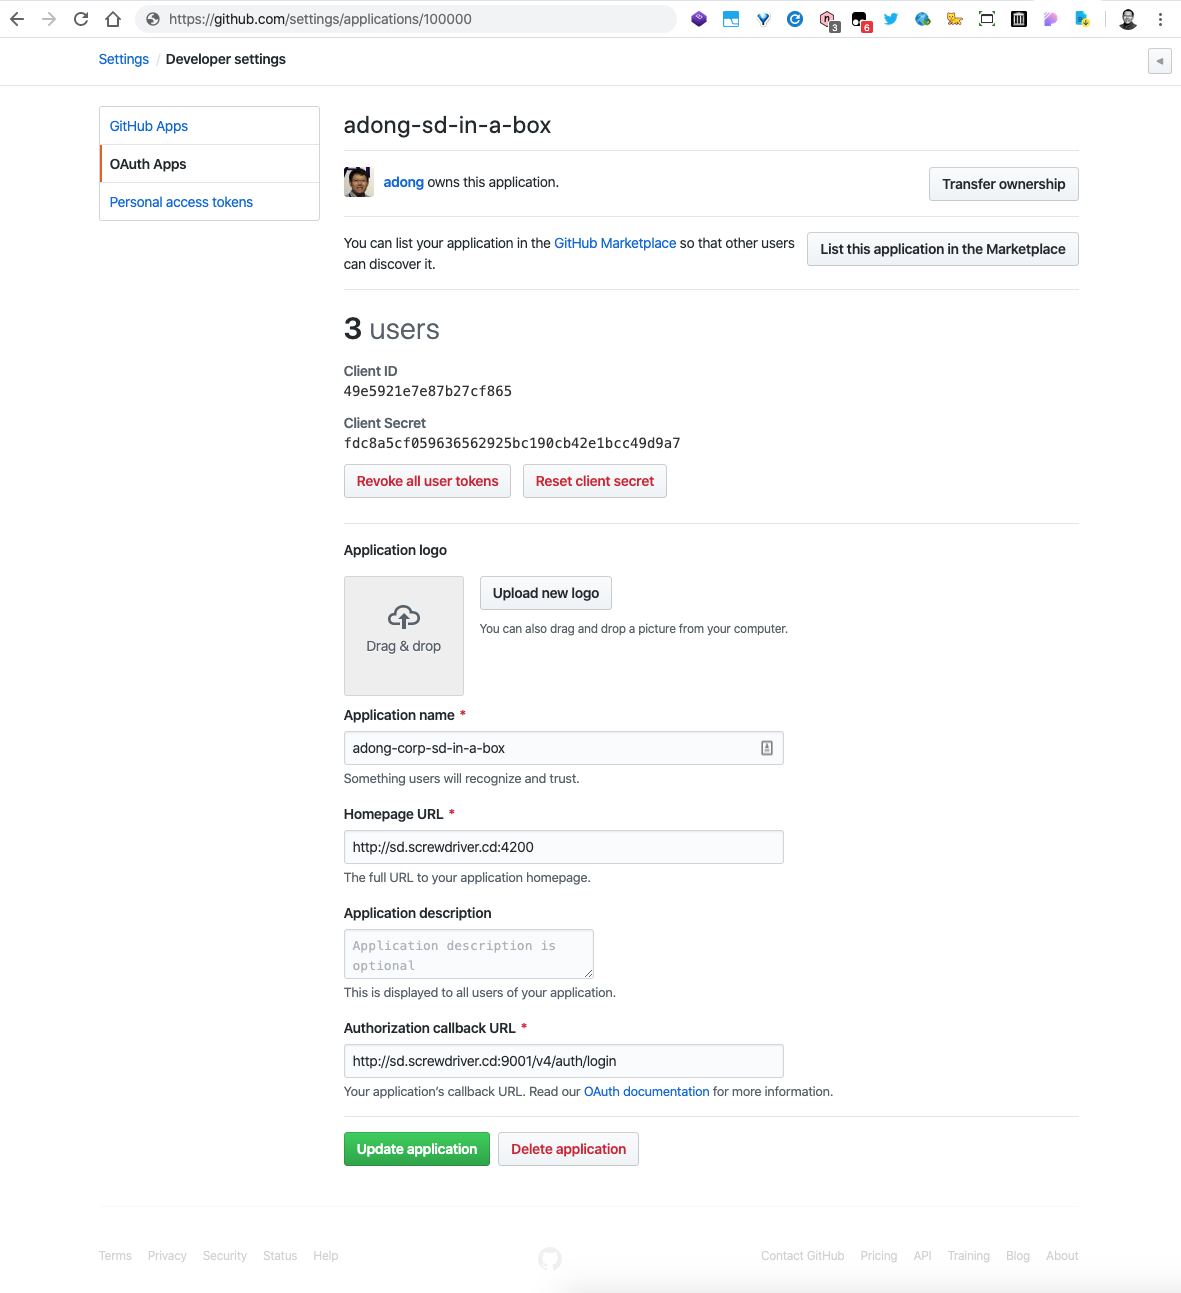
設定 > 開発者設定 > OAuth Apps を開き New OAuth App ボタンをクリックして以下のように設定します。
- Application Name: (任意の値)
- Homepage URL:
http://sd.screwdriver.cd:4200 - Application description: (任意の値)
- Authorization callback URL:
http://sd.screwdriver.cd:9001/v4/auth/login
以下のスクリーンショットをご覧ください。

次のステップで必要になるため、client IDとclient Secretをメモしておいてください。
ステップ3: screwdriver-cd組織のGitHubから必要なリポジトリをクローンします
git clone https://github.com/screwdriver-cd/ui.git
git clone https://github.com/screwdriver-cd/screwdriver.git
git clone https://github.com/screwdriver-cd/store.git
git clone https://github.com/screwdriver-cd/queue-service.git
ステップ4: 以下3つのリポジトリにローカル設定ファイルを追加
ui/configにlocal.js, screwdriver/configにlocal.yaml, queue-service/configとstore/configのフォルダにlocal.yamlファイルを作成します。
ui/config/local.js
let SDAPI_HOSTNAME;
let SDSTORE_HOSTNAME;

SDAPI_HOSTNAME = 'http://sd.screwdriver.cd:9001';
SDSTORE_HOSTNAME = 'http://sd.screwdriver.cd:9002';

module.exports = {
  SDAPI_HOSTNAME,
  SDSTORE_HOSTNAME
};
screwdriver/config/local.yaml
- GitHubのOAuth client Id (oauthClientId)とOAuth client Secret (oauthClientSecret)を記入してください。 (Step2で作成したOAuthアプリケーションに記載されています)
- 独自のjwtPrivateKey (jwtPrivateKey) と jwtPublicKey (jwtPublicKey)を以下の方法で生成します。
  openssl genrsa -out jwt.pem 2048
  openssl rsa -in jwt.pem -pubout -out jwt.pub
mkdir mw-dataと入力して、mw-dataというフォルダをscrewdriverリポジトリ内に作成してください。- あなたのIP(YOUR_IP)を記入してください。まずは、
ifconfigであなたのIPを調べてください。IPが変更された場合、このIPを更新する必要があります。
---
auth:
    jwtPrivateKey: |
        -----BEGIN RSA PRIVATE KEY-----
        *********SOME KEYS HERE********
        -----END RSA PRIVATE KEY-----
    jwtPublicKey: |
        -----BEGIN PUBLIC KEY-----
        ******SOME KEYS HERE******
        -----END PUBLIC KEY-----
httpd:
  # 待ち受けポート
  port: 9001
  # 待ち受けホスト (このマシンからの接続のみを受け付ける場合は、localhostを設定します)
  host: 0.0.0.0

  # 外部からルーティング可能なURI (通常はロードバランサーまたはCNAME)
  # Docker for executor内でルーティング可能なIPである必要があります。詳細は以下
  # https://github.com/screwdriver-cd/screwdriver/blob/095eaf03e053991443abcbde91c62cfe06a28cba/lib/server.js#L141
  uri: http://YOUR_IP:9001

  ecosystem:
    # 外部からルーティング可能なUI用URL
    ui: http://sd.screwdriver.cd:4200
    allowCors: ['http://sd.screwdriver.cd', 'http://YOUR_IP:9001']
    executor:
        plugin: docker
        docker:
            enabled: true
            options:
                 docker:
                    socketPath: "/var/run/docker.sock"
scms:
    github:
        plugin: github
        config:
            # github
            oauthClientId: your-oauth-client-id
            oauthClientSecret: your-oauth-client-secret
            secret: a-really-real-secret
            username: sd-buildbot
            email: dev-null@screwdriver.cd
            privateRepo: false
datastore:
  plugin: sequelize
  sequelize:
    # Type of server to talk to
    dialect: sqlite
    # Storage location for sqlite
    storage: ./mw-data/storage.db
store/config/local.yaml
- screwdriver リポジトリの
mw-dataファイルと同様に、mkdir store-dataを使用して store リポジトリ内にstore-dataというフォルダを作成する必要があります。
auth:
    # api.screwdriver.cdで署名されたJWTを検証するための公開鍵
    jwtPublicKey: |
        -----BEGIN PUBLIC KEY-----
        ******SOME KEYS HERE******
        -----END PUBLIC KEY-----

strategy:
    plugin: disk
    disk:
        cachePath: './store-data'
        cleanEvery: 3600000
        partition : 'cache'

httpd:
    port: 9002

ecosystem:
    # 外部からルーティング可能なUI用URL
    ui: http://sd.screwdriver.cd:4200
    # 外部からルーティング可能なArtifact StoreのURL
    api: http://sd.screwdriver.cd:9001
    allowCors: ['http://sd.screwdriver.cd']
ステップ5: 依存関係をインストールして、準備は完了です
各リポジトリ内で以下のコマンドを実行する必要があります。
npm install && npm run start
UI、Screwdriver API、およびStoreアプリが動作している間に、ブラウザでhttp://sd.screwdriver.cd:4200にアクセスすることで、ローカルのScrewdriverとやり取りすることができます。
ローカル環境でexecutor-queueを使う
単一のDockerエグゼキュータを使用する代わりに、Redisキューを使用することで、Screwdriverがより洗練されたワークフローを実行できるようになります。例えば、build_periodicallyやfreezeWindowなどです。
ステップ1: Redis サーバーとクライアントのインストール
Macのパッケージマネージャーとしてbrewを使用していますので、事前にローカルに
brewをインストールしておく必要があります。
brew install redis
起動するには、今すぐRedisを起動し、ログイン時に再起動します。
brew services start redis
また、バックグラウンドのサービスを必要としない場合、そのまま実行することもできます。
redis-server /usr/local/etc/redis.conf
Redisサーバーが稼働しているかどうかをテストします。
redis-cli ping
PONGと返ってくればOKです。
Redisの設定ファイルの場所です。パスワードを設定したい場合は”requirepass”を修正してください。
/usr/local/etc/redis.conf
Redisとそのファイルをアンインストールします。
brew uninstall redis
rm ~/Library/LaunchAgents/homebrew.mxcl.redis.plist
ステップ2: リポジトリqueue-serviceをクローンし、local.yamlを追加します
git clone git@github.com:screwdriver-cd/queue-service.git
queue-service/config/local.yamlを作成します
ローカルの設定を保存するためにこのファイルを作成します。
- 独自の jwtPrivateKey (jwtPrivateKey) と jwtPublicKey (jwtPublicKey) を以下の方法で生成します。
  openssl genrsa -out jwt-qs.pem 2048
  openssl rsa -in jwt-qs.pem -pubout -out jwt-qs.pub
auth:
  jwtPrivateKey: |
    # 前の手順で作成したjwt-qs.pemを貼り付けます。
  jwtPublicKey: |
    # 前の手順で作成したjwt-qs.pubを貼り付けます。
  # SD apiからのトークン署名を確認するために使用される公開鍵
  jwtSDApiPublicKey: |
    # 前の手順で生成したAPI公開鍵
 httpd:
  port: 9003
  host: 0.0.0.0
  uri: http://YOUR_IP:9003
 executor:
    plugin: docker
    docker:
      enabled: true
      options:
        docker:
            socketPath: "/var/run/docker.sock"
 ecosystem:
    # 外部からルーティング可能なUI用URL
    ui: http://sd.screwdriver.cd:4200
    # 外部からルーティング可能なAPI用URL
    api: http://$YOUR_IP:9001
    # 外部からルーティング可能なArtifact Store用URL
    store: http://$YOUR_IP:9002
 queue:
    # resqueを含むredisインスタンスの設定
    redisConnection:
        host: "127.0.0.1"
        port: 6379
        options:
            password: ''
            tls: false
        database: 0
        prefix: ""
ステップ3: screwdriver/config/local.yamlを修正、executorの構成を変更し、キューのURIを追加します。
 auth:
    jwtQueueServicePublicKey: |
      # 前の手順で作成したjwt-qs.pubを貼り付けます。
 ecosystem:
    # 外部からルーティング可能なUI用URL
    ui: http://sd.screwdriver.cd:4200
    # 外部からルーティング可能なArtifact Store用URL
    store: http://$YOUR_IP:9002
    # ルーティング可能なqueue-serviceのURL
    queue: http://$YOUR_IP:9003
 executor:
    plugin: queue # <- このステップは、キューを使用するために必要です。
    queue:
        options:
            # resqueを含むredisインスタンスの設定
            redisConnection:
                host: "127.0.0.1"
                port: 6379
                options:
                    password: ''
                    tls: false
                database: 0
                prefix: ""
ここで、Redisキューを使用するために、Screwdriverバックエンド・サーバーとキュー・サービスを起動します。
npm install && npm run start
launcherイメージを作成してローカル環境で使う
独自のlauncherバイナリとイメージの作成
git clone git@github.com:screwdriver-cd/launcher.git
cd launcher
env GOOS=linux GOARCH=arm go build .
docker build . -f Dockerfile.local
# xをIMAGE IDとします。DockerアプリでDockerアカウントにサインインしている必要があります。
docker tag X jithine/launcher:dev
docker push jithine/launcher:dev
API locol.yamlを変更して、ローカルのlauncherを使用する
 executor:
    plugin: docker
    docker:
      enabled: true
      options:
        launchImage: jithine/launcher
        launchVersion: dev
        docker:
            socketPath: "/var/run/docker.sock"